If you haven't been mixing your music with buses, auxes, sends, and returns, you've been producing songs on hard mode. These digital audio workstation (DAW) features can simplify your mixing workflow and allow you to run large projects without overloading your computer's CPU. We're going to explore the difference between buses, auxes, sends, and returns by taking a look at the way these features are implemented in Ableton Live and Pro Tools.
Signal Flow
To grasp these concepts, you need to understand how audio signals flow through your DAW. The term "signal flow" refers to the path a signal takes on its way from a source to a destination.
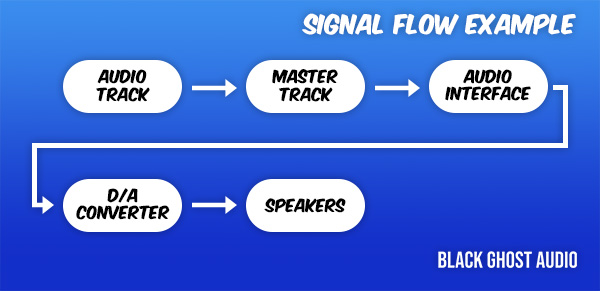
Audio can either be recorded to an audio track or created using a virtual instrument that's been inserted on a MIDI track. When you play back a sound, the audio or MIDI track is the source, while its destination is your speakers. Along the way, the signal runs through a few checkpoints.
First, the signal sums together with all the other tracks in your project as it passes through your DAW's master track. Your master track passes a stereo signal to your audio interface, where the signal undergoes digital to analog (D/A) conversion. An electric signal flows to your speakers from your audio interface and your speakers generate sound waves.
Buses
A bus is a point within the flow of a signal that multiple signals sum together. Your master track is a perfect example of a bus. Depending on the DAW that you use, your DAW's user manual may refer to the master track as a master bus or stereo bus.
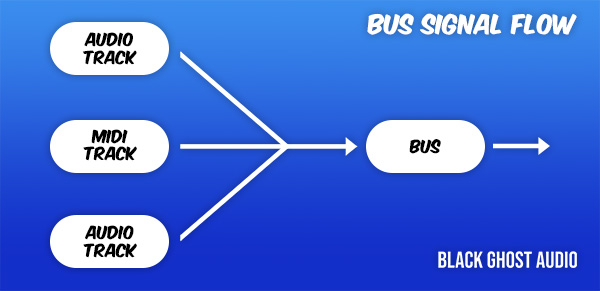
Buses are great because they allow you to apply processing to multiple signals at once. For example, maybe you want to apply some subtle saturation to your master bus to sweeten up your entire mix without applying a saturator to each track — it's perfectly acceptable to do this.
You can create custom buses that contain similar instruments. Perhaps you want to create a vocal bus that contains all of the vocal melodies, harmonies, and ad libs in your song. Grouping or "busing" together sounds in this way reduces redundant processing.
Instead of applying a low-cut filter to every vocal track to remove low-end rumble, applying a single low-cut filter to your vocal bus will have the same affect and reduce the load on your computer's CPU. Try experimenting with bus compression, reverb, and delay.
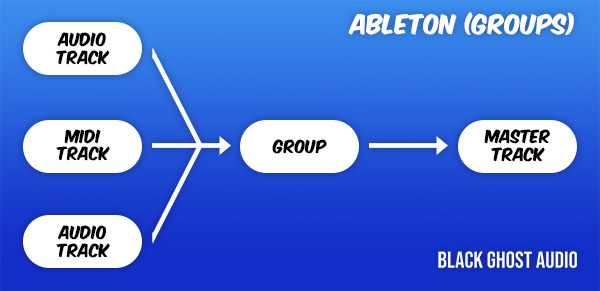
Most DAWs make it easy to bus tracks together. In Ableton, simply select the tracks you'd like to include in the bus and use the keyboard shortcut [Ctrl][G] on Windows or [Cmd][G] on macOS to group the tracks. The output of each track will be re-routed automatically. Instead of running directly through your master bus, each track's signal will run through your vocal group and then the master bus.
Auxes
Pro Tools is set up a little differently than other DAWs regarding the way that it uses buses. You need to route the output of tracks to a bus and then assign the bus to the input of an auxiliary track, or aux track.
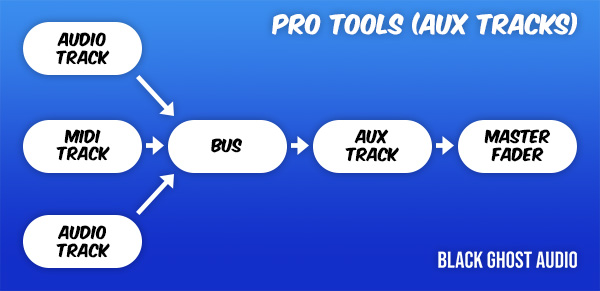
An aux track behaves very much like a group in Ableton; you can't insert audio or MIDI clips onto an aux track. All that you're allowed to do is pass audio through it and apply processing. Ableton essentially combines buses and aux tracks into a single feature, while Pro Tools separates them.
So what's the deal with the extra step in Pro Tools if the outcome is the same as in Ableton? Well, one of the benefits of the way in which Pro Tools is configured is that you can assign tracks to multiple buses; this cracks open a world of routing possibilities.
For example, you can create a unique headphone mix for each performer that you're recording using aux tracks. If your guitarist wants to hear the drum bus and and vocal bus, assign those buses to the guitarist's dedicated headphone monitoring aux track.
Route the guitarist's custom headphone mix to a pair of outputs on your audio interface and hand the guitarist a pair of headphones. You'll be able to monitor the full mix in your studio's control room, while your guitarist selectively listens to the song's drums and vocals in your studio's live room. In commercial recording studios with multiple rooms, this is a popular method of setting up headphone mixes.
Feel free to create custom headphone mixes for all your performers. The only limitation is the number of outputs available on your audio interface.
Sends and Returns
Pro Tools' aux tracks can be used to apply parallel processing, in addition to summing signals together. For example, it's quite common to apply reverb to a song using a single aux track, as opposed to applying a different reverb to every track individually.
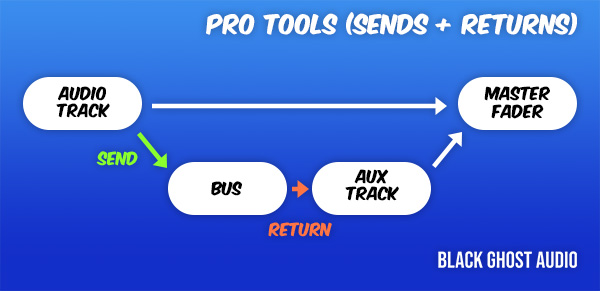
In Pro Tools, you can set this up by creating a send that routes a duplicate copy of a track's signal to an aux track. If you don't see a Sends section, right-click on the text that says "Inserts A-E" and select "Sends A-E". Assign the send to an available bus and then route the bus to an aux track. The path a signal takes on the way from a bus to an aux track is called a return.
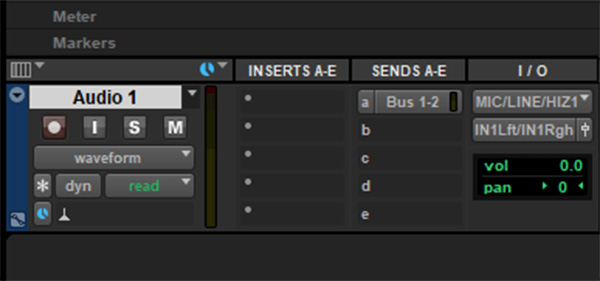
Insert a reverb onto your aux track and turn the reverb's dry/wet value up to 100% wet. You'll adjust the send's fader to control the amount of reverb applied to each track. Treat your original unprocessed track as the dry signal, and the aux track you created as the wet signal. You now have a reverb aux track that's running in parallel with your original track; this is what's referred to as parallel processing.
In Ableton, the terminology used to refer to aux effect tracks is odd. Ableton refers to its aux effect tracks as "return tracks", which isn't something I haven't seen in other DAWs. However, return tracks allow you to route signal through them and apply effects, just like an aux effect track in Pro Tools. Whether someone refers to an "aux effect track" or "return track", they're talking about the same thing.
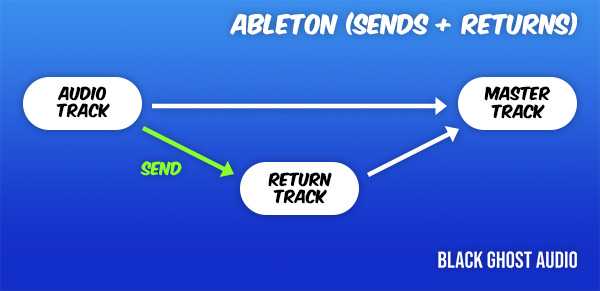
When you create a return track in Ableton, a send parameter is added to every track in your session. Modifying the send parameter allows you to control the level of the duplicate signal sent to the send's associated return track. You don't need to worry about assigning your sends to buses and your buses to aux effect tracks in Ableton; all of this routing is handled behind the scenes for you.

The cost of Ableton's convenience is that you don't have as much signal routing freedom in comparison to Pro Tools. Ableton also maxes out at 12 return tracks, whereas you can create as many as buses and aux tracks as you like in Pro Tools. I never use more than 5 or 6 return tracks in Ableton so this has never been an issue for me but it's still something to consider.
Summary
To summarize, a "bus" refers to a point in the flow of a signal that multiple signals sum together. An "aux" is a track that allows you to pass and process bused signals, but does not allow you to insert audio or MIDI clips onto the track.
You can use a bus to group signals together and route them through an aux track and process the signals as a group. Alternatively, you can use a "send" to duplicate a signal, route it through a bus, pass the signal to an aux track via a "return", and apply parallel processing.


